Python Documentation
This will explain how to automatically generate Python documentation with Sphinx using docstrings.


What this will teach:
· How to document Python code
· How to automatically generate documentation
· How to use the reStructuredText markup language
· How to create a project website using Sphinx
What you will need:
· Software:
· Python 3
· Sphinx
What you need to do:
Python allows you to add information about your program into your code using docstrings. Docstring are the basis for creating documentation for your code.
You can add docstrings at the start of a module, class or function and is framed by three double quotation marks “””
def helloworld():
“”” prints ‘hello world’ to the screen “””
print(“hello world”)
Now that you can annotated your code with docstrings, you can use Python’s pydoc module to automatically create HTML documentation about your code.
1. Open the terminal window or command prompt window
2. Navigate to the folder where you have your program
3. Enter the command to run the pydoc module to create documentation
For Windows: python -m pydoc -w .\card.py
For Raspberry Pi/ Linux/ Mac: python3 -m pydoc -w ./card.py
When the command has finished running you should have a command ‘wrote program_name.html.’ Pydoc used the name of your python program.
Open the html file using your web browser to see the documentation you have created: you should see a page that shows classes, their methods and properties including the descriptions you added as docstrings.
You could upload this basic HTML page to a hosting service to provide your users with information about your software. The next steps will show you how to use the Sphinx tool to build a documentation website to which you can add additional content and information.
Using pydoc and docstrings is a great way to create structured documentation about your code, but it has limits because you can’t add additional information and content.
On a less basic website, similar to e.g. the one for GPIO Zero, you can add a lot more information in addition to documentation, such as recipes, FAQs, images, and code snippets.
You will use Sphinx to create such a project website. This tool was originally created for documenting the Python language.
To create content for your Sphinx website, you will write text files formatted using the simple but powerful markup language reStructuredText(ReST).
For Windows: pip install Sphinx
For Raspberry Pi: pip3 install Sphinx
For Mac/ Linux: sudo pip3 install Sphinx
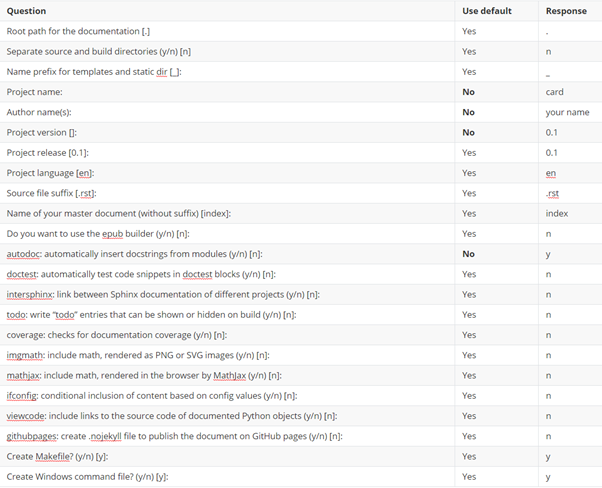
Next, navigate to the project directory using cd. Then, run the Sphinx quick-start utility by running sphinx-quickstart
Use the following responses to complete the quick-start questionnaire that will determine properties and settings Sphinx will use for your website.
Note: There’s a fair number of questions — you’ll use the default answer for all but four of them by pressing Enter.
The Sphinx quick-start program will make a number of files and directories where your documentation will be created.
The key files and directory are:
· conf.py — a Sphinx configuration file that describes how your documentation should be created
· index.rst — the main page and index of your documentation
· _build — the directory where your documentation will be created
Build your website
To view your project website, you will need to build it. This converts all the project files into HTML files.
Run make html to build your website.
This will create a html folder in the _build directory that will hold the project website files.
Open the index.html file in the _build/html directory using a web browser.
You will see an empty project site.
Next you’ll add your own content to the project site, including auto-generated documentation for your code.
Adding your code documentation
Configure conf.py
So it can include the code documentation, Sphinx needs to know where to find it. You tell Sphinx this by modifying the conf.py file.
Open conf.py
Uncomment this code by removing the # characters.
import os
import sys
sys.path.insert(0, os.path.abspath(‘.’))
This adds the current directory . to Sphinx’s configuration so it can find your code files.
Add your code documentation
Create a new file called code.rst. This will be your code documentation page.
Add a title to the page:
Code docs
=========
Add the following code to import the card.py module.
.. module:: card
Next, add this code to automatically generate the documentation for the Card class:
.. autoclass:: Card
:members:
In order for your code.rst page to appear on your project website, it needs to be added to the index.
Open index.rst.
Modify index.rst to add the code page under the table of contents ..toctree:: — the code should look like this:
Welcome to card’s documentation!
================================
.. toctree::
:maxdepth: 2
:caption: Contents:
code
Rebuild your project website.
make html
Reopen the index.html file in the _build/html directory using your browser.
Your code page will now appear in the index.
When you open the code page, you will see your auto-generated documentation about the _aclass class.
Update code.rst to auto-generate the documentation for the Deck class.
You’ll need to add this code into code.rst
It should look like:
Code docs
=========
.. module::card
.. autoclass:: Card
:members:
.. autoclass:: Deck
:members:
##should be your class names
Rebuild your website and check that the code page now includes documentation for your classes.
Creating pages
In addition to pages that describe your code, you can include pages with other content on your project website.
All the pages you want to add need to be formatted using the ReST markup language. This primer will show you how to use the most common ReST syntax elements.
To get started, let’s create an About page that will display some details about the project and where to find more information.
Create a new file called about.rst.
Add a title to the page:
About this project
==================
Add some text about the project, for example:
Deck of cards is a set of classes for creating playing cards.
Perhaps add a hyperlink to the project’s source code:
You can create this project yourself by visiting `this page <https://projects.raspberrypi.org/en/projects/deck-of-cards>`_.
The structure of the URL markup is very specific in ReST.
The text for the link and the URL itself need to be in between two back ticks, the second of which is followed by an underscore _, like this:
`link_text <url>`_
Note: it is important to put a space between the link_text and the <url>.
This type of markup is referred to as in-line, because it is within the text.
You can also create separate URL definitions and then refer to them anywhere within the text — this is useful if you want to link to the same URL twice.
When you have finished creating your about.rst page, add it to the index.rst file.
Welcome to card’s documentation!
================================
.. toctree::
:maxdepth: 2
:caption: Contents:
about
code
Rebuild your project to see your new page using the command:
make html
Add a second page to your project site, e.g. with FAQs.